Tips for Shooting in Manual:
Remember you must set both the Aperture and Shutter Speed!
1. Get a Baseline in Program Mode: Choose P (Program) mode to get a baseline Aperture and Shutter Speed.
2. Setup Manual Mode: Turn your mode dial to M (Manual) and dial in the same Aperture and Shutter Speed. NOTE: It is vital that you remember when you shoot in Manual, YOU MUST SET BOTH THE APERTURE & THE SHUTTER SPEED.
3. Adjust the Exposure: If your image is too dark, then turn your Aperture to a lower number, or slow down your Shutter speed. Do the opposite, if the image is too bright.
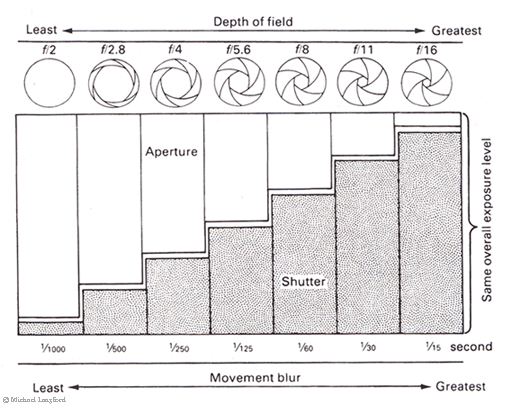
4. Customize the Aperture: Once your exposure is just right, you may want to adjust the Aperture to get shallower or greater depth of field, but if you change the Aperture one stop, you need to change the Shutter to compensate. See the diagram below to learn how Shutter and Aperture work together.
EXAMPLE: If your Program mode Baseline is f/8 – 1/60 200 ISO…
A. For a shallower depth (more blur) change the Aperture two stops to f/4. This opens the lens diaphram. Now you won’t need as long a shutter speed, so you would change the Shutter speed two stops to 1/250.
B. For greater depth of field, (everything sharp) change the Aperture two stops to f/16. This closes the lens diaphram. Now you will need a longer shutter speed… so you could move your Shutter speed two stops to 1/15. However, now you would need a tripod or your shot will be blurry. If you are shooting a landscape, a tripod with a low ISO is your best solution. However, if you shoot live subjects at shutter speeds below 1/60, camera or model movement can cause blurry images. So, if you really want everything in focus with a live subject (f/16, f/22, etc.) you will need to increase your your ISO a few stops to say 800 or 1600. Now you will be able to get a f/16 with a faster shutter speed of about 1/125 so you won’t get a blurry photo from camera shake or model movement.
5. Take the Shot: If your image is too dark or too light, adjust the Aperture, Shutter, or ISO to compensate.
Shooting in Manual mode gives you total control!
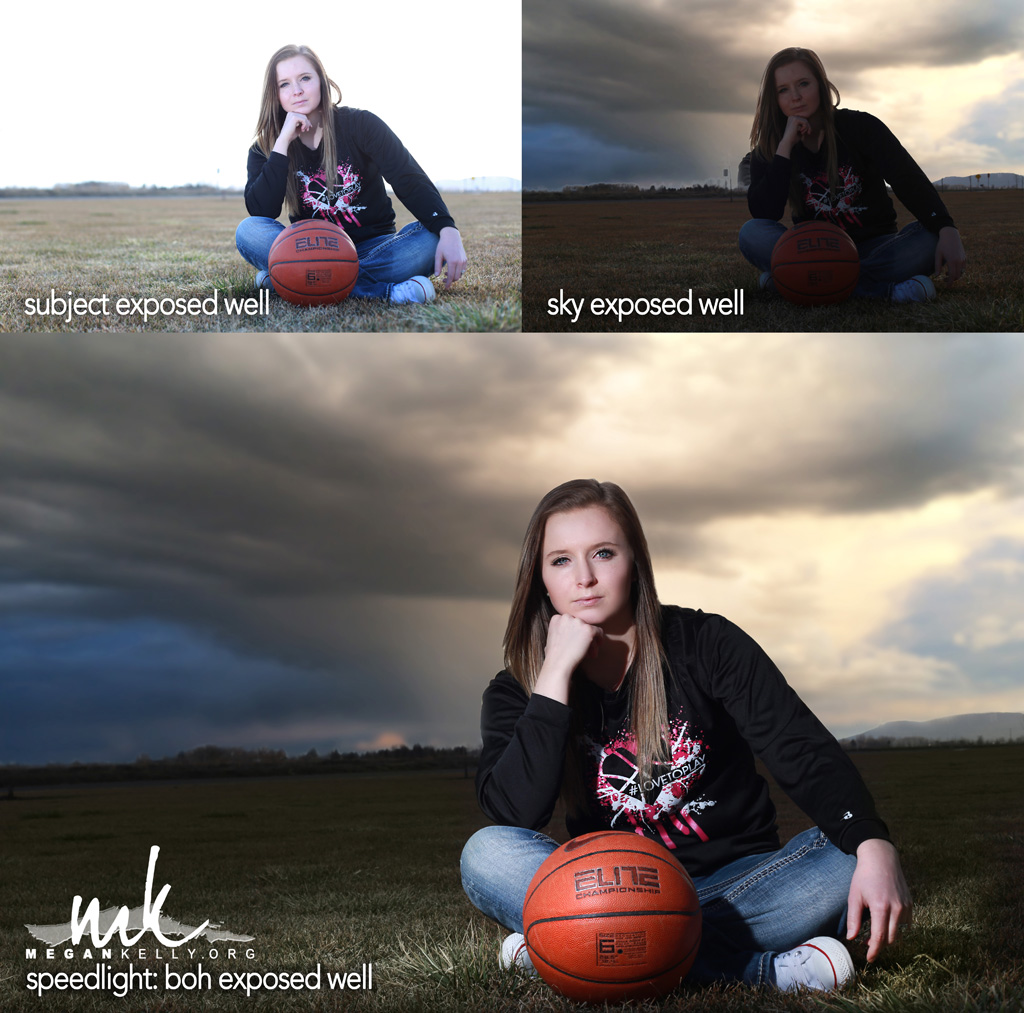
Tips for Using Flash
NOTE 1: If you are using a flash, you also need to adjust the power of your flash so you balance the light and don’t overpower your subject with unnatural light.
NOTE 2: When shooting with a flash, your shutter speed must be between 1/60 – 1/250 or half of your frame will be black.
Study this diagram to learn how Aperture and Shutter Speed work together: