Google it: “Photobook portfolio” – Photobook Examples & Tips
Instructions
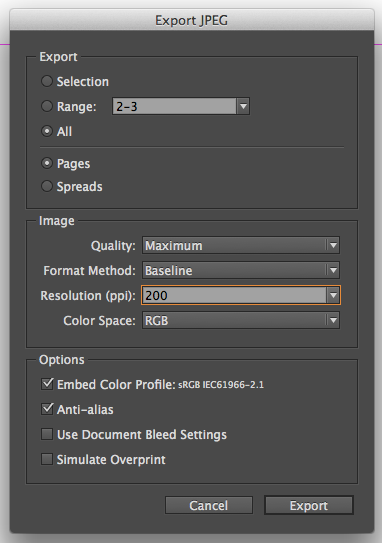
It’s fun and affordable to showcase your images, memories and design work in a photobook! Follow these tips to save you time and headaches later. The most important thing is that you create and design your own custom pages. Though it takes time, designing your own book will look more professional than using the pre-made templates and scripting available in the publishing software. You can blend images, use your own backgrounds, and add custom layouts with meaningful descriptions to each page. Furthermore, you can create a two- page spread with images that extend from one page to the next. Once you design your pages in one InDesign document, you will save them as individual jpegs (RGB, 200 ppi) and upload them to arrange in the online software to order your book.
Top Five Tips
1. Keep it to 20 pages. You can make a longer book once you know which techniques work best.
2. Use small type. Text looks bigger when it is printed in the book than it does on the screen.
3. Make images lighter. Pages print darker.
4. Print a few spreads in color. This way you can test colors, brightness, and font size.
5. Keep all type 3/4 inch from edges, and 1.5 inches from centers.
Requirements
Your photobook will include 20 pages:
1. 20 page + front and back cover, 8x11 Walmart, use either: hard custom cover, soft custom cover, or custom cover layflat . This layout will not work for the premium layout.
2. Theme: Create a consistent theme. Use graphic elements, such as similar page backgrounds, colors, frames, shapes, shadows, effects, and filters, etc. throughout the entire book.
3. Pages: You will design a front and back cover and 20 pages: TOC, 18 Content pages, and Professional Page (see below for details). Page size for Walmart
4. Images from Blog: Include at least one image from each blog assignment, but you may skip two of all the blog assignments you’ve made this semester. All images in your book must be on your blog. Make sure that when you link your images to your
5. Quality writing: You need to have headings to divide the book into sections and at least five pages with a few paragraphs (3-5 sentences) of detailed information about your photography, location, process, skills, etc. (You will be graded on spelling, grammar, and professional use of punctuations.)
6. Cover: Add book title and your name. You will add Book Title and your name as spine text once you have uploaded your pages on Walmart’s website.
7. Contents Page: Include page titles and page numbers, but page numbers are not required on individual pages. Make sure to not place any text or important content within .75 in of the edge of your page. If you want a full bleed page, place your images on the edge, not at the .75 margin.
8. Professional Page: Name, portrait (with attribution), blog URL, Social Media, Contact info. Artist’s statement. Identify your work. Example: Photography, editing, layout design, writing by “Your Name”
Typography Guidelines: Apply the rules of typography from Comm 130 and use only one or two, contrasting fonts. Simple, clean, classic fonts create a consistent and professional look. You will need one simple font for body copy 10 point size. Design a consistent
Design Pages in InDesign
Setup your book in one Adobe InDesign document, using master pages
1. SETUP: Open a new 20-page document in InDesign, these 20 pages are for your inside pages, not your cover. Make your pages 8x10.62 and set up your document with Facing Pages checked, so you can see the two-page spread setup. This will help you design the pages as they will be seen: side-by-side with facing pages. You should also use 3/4 inch margins to remind you to keep text away from the edges! You may have your images on the edge of your book. You need to keep important design and text elements away from the center to allow for bookbinding and page bend. Do this by creating a .75 inch margin when you create your Indesign document for your 20 pages. Keep in mind that page 1 is your Contents Page, then you will have 18 pages and the last page is your Professional Page. You will design your book COVER as a separate document. When you create your document in Indesign, create a three-page document so that your second and third pages are a single spread. Your cover pages should have a 1.25-inch margin. The back cover should be on the left spread and the front cover on the right spread. You may want to use Photoshop to design your cover images (one for front and one for the back) for image blending, etc. Add a book title and your name on the front cover. Save the images as jpegs at 200
DOCUMENT SETUP checklist:
• 20 pages for one document
•
• Facing pages
• Size: 8 x 10.62
• Margin:Top/Bottom/Outside: 0.75 in; Inside: 1.5 in
2. CREATING A COVER – Be sure your cover image is creative and sets the theme for your book!
Required: Full-bleed Photo Finish: Design a full custom cover for the front and back. You will also be able to add text on the spine when you order your book. While both uploaded covers are shown on Walmart’s project edit page, select the spine of the book to add text and to change the text color. If you would like to change the background color of the spine, click on colors under the Layout menu on the left. The dimensions for the Walmart 8x11 books should actually be sized at, 8 x 10.62 inches at 200-300 ppi. Create a separate page for the front and back.
3. QUALITY CONTROL: Make all your edits and changes to your InDesign document (.indd), which we call the native file format. When you want to export each page as a jpeg to upload to Walmart, you will need to choose 200-300 ppi (depending on your internet speed) to maintain good quality. However, when you are creating a PDF just for proofing, you will want a lower quality (such as 150ppi) to keep the file size small.
4. MASTER PAGES: Go to the Pages palette in InDesign and double-click the Master A pages. Create your background design. All 20 pages will immediately be populated with this background. Anytime in the design process, you can make a change to all your pages, by changing the master pages. If you want more than one background design, add additional master pages to use, then assign the Master B to the individual pages you want to look different. Select the page to change, and click on the dropdown menu in the Pages palette. Then choose Assign Master Pages to choose a different master. Then follow the Master Pages Video Tutorial to set up your document.
INDESIGN VIDEO TUTORIALS:
5. CREATE THE PDF PROOF + MERGE WITH COVER PAGES (smaller file size for the draft and proofing) A PDF proof is a perfect way for your clients or anyone to preview your book before it is printed. It is also nice to email as a sample of your work. Simply go to File-Export and save your document as a PDF. The file should be under 5 mb, so you may need adjust the Compression to get the file size down to 150 ppi, as you add more pages and images. Also remember to merge your cover pages with your content pages in the same PDF since they’re in two different InDesign file. Below is a detailed instruction on how you do this:
2. Export your content pages (including TOC+Professional Page) as another PDF (also in Smallest File Size). Name the file descriptively. Example: photobook-content.pdf
3. Go to pdfmerge.com and put in your file in the correct order (your front cover on top, your content pages, then your back cover)
4. Click on “Merge“. The website will automatically merge your PDF and download it to your computer.
5. Rename the filename with your name. Example: YourName-photobook.pdf
6. SAVE HIGH-QUALITY PAGES AS JPEGS (200 PPI) FOR UPLOADING: Create a new project folder and save your document as an .indd document. If you will be opening the file in an older version of InDesign, save it as a .idml file so it will be backward compatible (Go to File Export…idml). Then save your pages as individual jpegs. Go to File – Export and save all pages at 200 ppi RGB (300ppi if you have a super good internet connection). Choose the project folder and all your images will show up there with separate page numbers in order.
7. UPLOAD & BUILD BOOK: Set up an account with your online publishing software, such as MyPublisher. Upload your individual jpegs and insert them in the book builder.
IMPORTANT: Be sure to backup your files to at least two different locations once a week.
Have fun with photobooks! The only problem with this new and affordable adventure is how addictive it is. You may find yourself creating photobooks for every occasion: birthdays, travel journals, graduations, documentaries, life histories, portfolios, weddings, anniversaries and annual family scrapbooks.